Return to 1401 Software Development
ROPE - "Hello World"
The goal of this page is
- write, assemble, run your 1st sample 1401 program on your PC
- "try this thing out"
- "YES, I can do this !!" :-))
I hope this description is a "ROPE For Dummies" ;-))
Introduction
|
One reason the IBM 1401 was so popular was that it was so simple to setup (program) and use
(Inspite of its famous sales force and service, IBM had some flops.)
The IBM 1401 was designed to be a simple "swing machine" between
Here is a hint of the simplicity.
|

OK !! Lets Start,
Step 1
|
Assuming you have looked at Introduction to ROPE
- which shows how to down load ROPE - introduces you to various screens and concepts let us think of a simple program.
Let us "print out" the famous "HELLO WORLD" :-))
We assume you have: - down loaded ROPE as described here - started ROPE and looking at the Edit Screen - loaded existing source code ( .s ), assembled it, looked at the listing, - - - amd run the code, viewing the printed output, looked at memory and status So - now what ??? ;-)) |
Step 2 Make a source file called "HelloWorld.s"
|
You cannot originate a .s file in ROPE, so, use Windows NotePad
- type in a simple program and run this simple program :-)) - you should read the manua |
Step 3 Use ROPE to load and edit this new "HelloWorld.s" file
|
You cannot originate a .s file in ROPE, so, use Windows NotePad
- type in a simple program and run this simple program :-)) - you should read the manua |
- activate "Windows Explorer" (this is not "Internet Explorer") by
- in the lower left of the screen, click on "Start"
- in the new window, click on "Computer"
- This brings up a little window called "Computer" which shows your disks
- DoubleClick on your " C: " drive which shows the directories (folders) it contains
- Go to your " ROPE " directory/folder
- you are looking at a " Windows Explorer " window with about 18 oddly names files
- the file you want to start is " ROPE1401.jar " - Double click on " ROPE1401.jar ", and if you have JAVA installed and able to activate,
- you get the opening " ROPE " window
- labeled " ROPE/1401 by Ronald Mak (Version 0.7 Beta) " :-))
This is a series of displays

Directory screen | . |
This is the " Windows Explorer " (detail mode) of most of the ROPE directory from the .zip file.
The " ROPE1401.jar " entry is highlighted. DoubleClick on this to get started (below)
| 
Edit screen
| 
Detail This is the initial ( Edit ) display
| You have choices of: - " Browse " for existing files - edit file in window - name a new file, rename and/or save existing file - change Assembler options (current default are OK) - cause file to be assembled ( AutoCoder )
| 
Browse screen
.
|
This is the " ROPE " Browse window, the " .s " files indicate source files
| lets select " powers2.s " You will DoubleClick on this to get started (below)
| 
powers2 source
| 
powers2 detail
OK - this is the powers2.s file, ready for editing, saving as, or assembling :-))
|
Remember that you need an END-AND-TRANSFER card, the last card in this deck is
| 
Assembled window
| 
"Listing" detail
Depressing the " Assemble " button on the Edit window yields two more windows
| - EXEC:powers2 - shows the " assembly listing ", often printed during assembly - PRINTOUT:powers2 - still blank as the assembled program not yet run
|
"Listing" detail
.
|
Note some of the controls in this window
| - " Start Program " - starts program which runs until breakpoint or end - " Mempry " shows the selected range of memory
| 
PRINTOUT top
| 
PRINTOUT bottom
The running power2 prints out onto the printer
| - " PRINTOUT top " - the beginning of the printout, goes several pages - " PRINTOUT bottom " shows the end (bottom) of the "1403" printout
| 
Computer memory
.
|
This is contents of the user option range of 1401 memory.
| It is in printer memory dump format, the " 1 "s below the contents indicate the position of the word marks.
| 
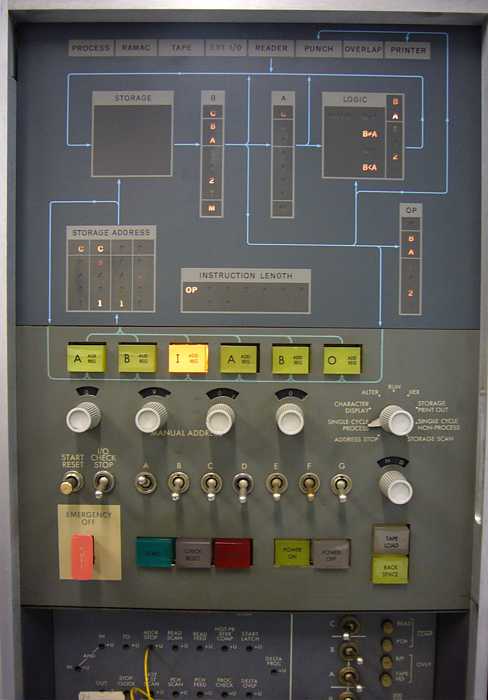
Console indicators
.
|
Console indicators and switches :-))
|
| 
BreakPoint indicators
When program execution
| reaches a breakpoint, it is suspended. You may examine memory and console.
Program "development", sometimes called "debugging" ;-))
|
BreakPoint indicators - you can debug programs in several ways
|
See more detailed instructions for attaching peripherals such as
card reader, card punch, magnetic tapes.
ROPE file naming conventions
| xxx.cd | - card punch (object deck) output from AutoCoder assembler (in ASCII rather holes in card)
You may actually punch out this deck this method which loads and runs on a 1401. xxx.out
| - printer output from user program (in ASCII)
| xxx.s
| - source program code to AutoCoder assembler (in ASCII rather than BCD)
| xxx.lst
| - printed "listing" from AutoCoder assembler (in ASCII)
| |
return to main page
Return to 1401 Software Development
Started Jan 20, 2012
Last updated Jan 22, 2012
For comments, corrections, questions e-mail Ed Thelen ed@ed-thelen.org